More Great Yoga Poses For Reading
This list of yoga poses for reading was originally published as an exclusive for Book Riot Insiders. Sign up for a free two-week trial and join the club!
I’ve been a dedicated yoga student for over five years now, as a teacher for close to four. I’m wrapping up my 500-hour certification this month (think of that like graduate school level). While I’m still trying to envision what that’ll look like as an all-digital program and face the fact I won’t get to graduate in person with some of the incredible folks I’ve been studying with over the last year, I am in many ways grateful I got to end my in-person portion with a week-long intensive at the beginning of March. I drove home from Iowa, from 12-hour days, from 7-hours of practice during those days, with memories, skills, and experiences with seven fellow yogis who challenged and encouraged me in the best possible ways.
For my Insiders piece this go-around, I thought it would be fun to share five accessible yoga poses you can do any time while reading. All of these can be held for quite a while — just listen to your body when it asks you to move or shift, and any pain you feel is a sign to skip the pose, add some support in the way of blankets or towels, or make a modification that feels good. There’s being in good alignment not to cause injury to your body, and then there’s listening to your body telling you to do something different because it feels better. The second is, in my opinion, where real magic in yoga happens. Alignment is a template from which to work from.
This would be an ideal order to do the poses in, but you can do any of them alone.
Sphinx Pose
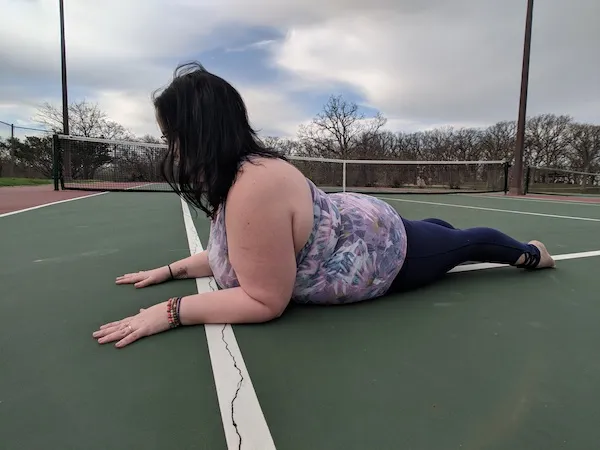
How to: Lie down on your belly, with your legs extended behind you. Option here to put your shins up a wall if you’d like, too. Keep your belly and pelvis connected to the floor the entire time to protect your low back. From here, bring your elbows directly beneath your shoulders and extend your forearms in front of you. Your upper back and chest will come off the floor and you can read with the book on the floor or propped up on a pillow or reading stand.
Benefits: It’s a mild backbend, so it lengthens the front of your body and compresses your back body. This helps compensate for slumping forward that we tend to do sitting at desks during the day. It also gives your internal organs a massage since they’re pressing down into the Earth, and it can help bring some energy into your body.
Note: After you do a backbend, even one this accessible, don’t immediately fold forward or move quickly. It’s best to come flat to your belly and let yourself be quiet and still for a few breaths.
Supported Twist
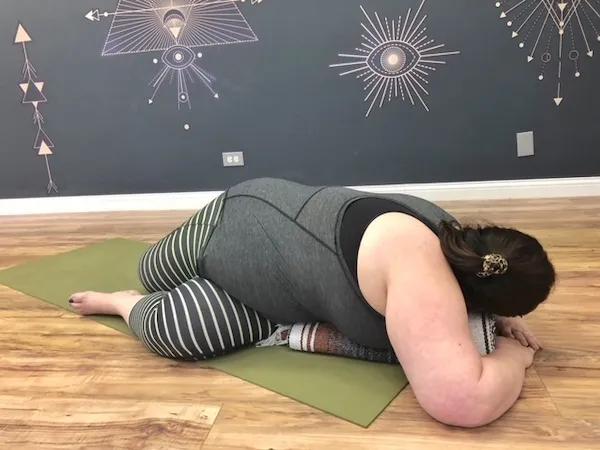
How to: Grab a blanket, pillow, or stack of pillows. Another option is to grab a few thick books and lay a blanket or pillow on top of them for a makeshift bolster. Bring your right hip flush to the blanket or pillow, bending your knees at a right angle. From here, lengthen your spine and, leading with your sternum, bring your torso flush with the blanket or pillow. Depending on what you’d like in terms of a neck stretch, turning your head the same direction as your knees will be less intense, while turning away from your knees will be more intense. Prop your book up in front of you, whichever option you take.
Benefits: Twisting is a great internal flush and helps with digestion. It’s great for spinal mobility and it’s neutralizing to the spine — this is a pose to do after a backbend especially.
Note: if the pillow or blanket are too far from your torso to be comfortable, add more height. Knees can stay stacked or, if it feels okay on your knees, you can let them come apart from each other as I do in the photo. I find that’s more supportive for my body to find the twist.
Supported Fish
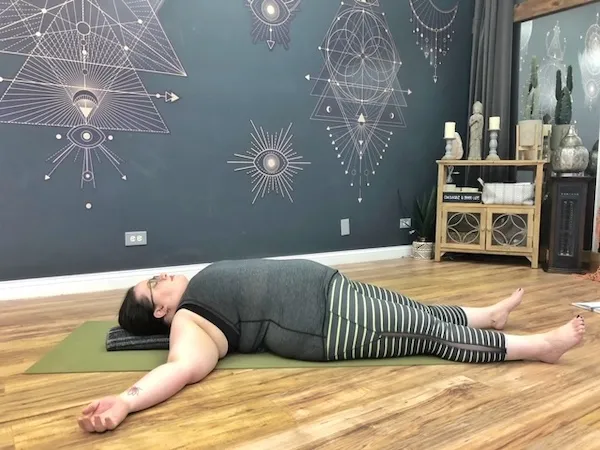
How to: This is one of my favorite poses and one I always tell students is so easy to do and enjoy at home when you’re doing something like reading (or watching TV). Grab your blanket and make yourself a roll of it. It can be as thick a roll or thin a roll as you prefer. Place it on the ground the long way and bring the back of your hips to the end of the blanket, slowly lowering your spine onto the blanket roll. Your head might be on the blanket, depending on the length of your blanket and spine, or it might be hanging off. If having it hang off isn’t feeling good, grab a pillow or second blanket to prop under your head. Your legs can be long in front of you, your knees can be bent with your feet on the floor and knees knocked in on one another, or you can bring the soles of your feet together and let your knees gently fall out to the sides. Choose your own adventure!
Benefits: This is a heart opener, so you’re undoing the habit of hunching your shoulders and slumping forward. It’s also great for those tiny muscles in your ribcage area along the side body called the intercostals.
Note: This is another backbend and while it’s very mild and restorative, come out of it slowly. Bend your knees and roll to one side, remove the blanket roll, then return to your back for a few breaths to neutralize your spine.
Bananasana
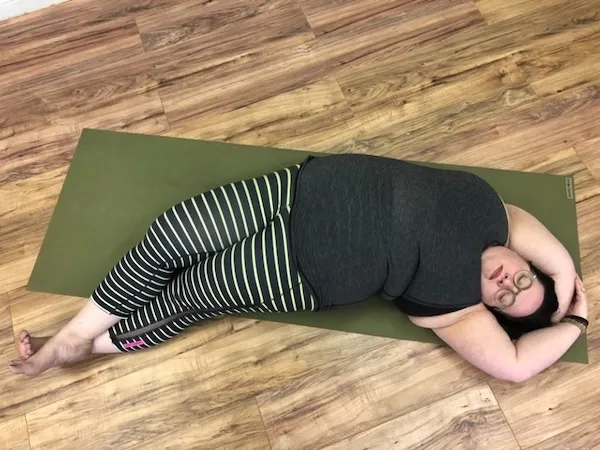
How to: Continue to be on your back, but this time take a full body stretch, bringing your legs long beneath you and arms long overhead. Take your left wrist in your right hand and keeping your hips cemented to the ground, bring your torso over to the right. Then, hips still and grounded, walk your feet and legs to the right. Option here to bring your left ankle on top of your right for a little more depth. You’ll be in the shape of a banana, and you can release your arms here for reading purposes. When you’re done on this side, return to center and do the same movement, this time bringing your torso and legs to the left.
Benefits: The spine is created to move in six directions, but rarely do we move it in the lateral plane (AKA sideways). This does that, and it creates a really wonderful side body experience. This one also works the IT band, which for runners especially, can be extremely tight and in need of release. It’ll open your chest and ribs and give your belly a really nice stretch, too.
Legs Up The Wall
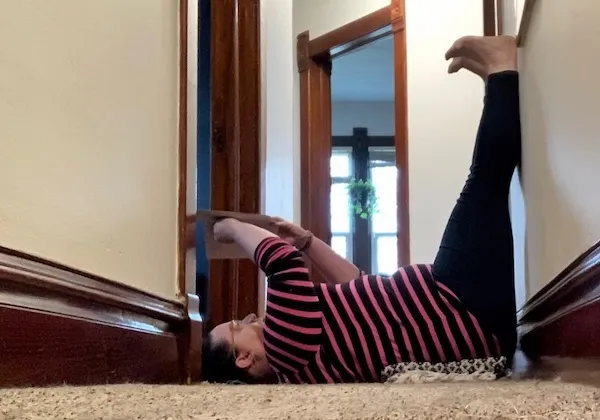
How to: Bring your right hip flush with a wall, your legs extended in front of you so that your right leg is also against the wall. From here, begin to lean back on your arms, then your forearms, bringing your right leg, then left, up the wall. The backs of your legs will be on the wall now, with the backs of your hips flush with it. Your torso and legs will be in the shape of an “L.” You can add a pillow or blanket beneath your lower back or head or both for more support.
Benefits: Getting upside down — legs over your heart — flushes fresh blood through your system and can be so, so good for lowering anxiety. This pose can be really relaxing and restorative, and I’ve found that personally, it’s helpful when I have a headache, too (not necessarily a known benefit, but worth trying if you, like me, are always looking for something to help those).
Note: Yes, it’s awkward to get into. You’ll do a lot of weird wiggling. But it’s worth it! To come out of this pose, the easiest way I’ve found is to hug your knees into your chest, then roll over to one side. This’ll let your arms help you come back to a seat or flat to your back or belly.
Want some yoga books to read while you’re doing yoga? (That’s called synergy, right?) Here are 16 of the best yoga books for beginners! And here are even more poses for reading!


