
A Bookish Christmas Card to Make
I shared a few suggestions for bookish Christmas cards that you can buy, and I promised I would be back with a few more that you can make yourself. I am a woman of my word. Here is one of the DIY cards that I have a lot of fun making.
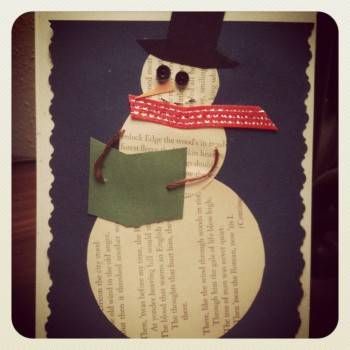
First, I want to point out that this design is dependent on book pages. I originally used pages from an old book that I had on the shelf that was literally falling apart. This year, I thought it might be fun to actually use a Christmas book, but I didn’t have any old copies lying around, and I didn’t want to buy a new copy and tear it apart. The next best thing? I went to the Project Gutenberg site and looked up an illustrated edition of Charles Dickens’ A Christmas Carol. This way, I can use the exact words that I want to in each of my different designs. It’s as simple as copying and pasting the words you want into word, then printing them out on the paper of your choice.
This is the card that I designed last year. I made these cards for an international holiday card exchange for book bloggers, as well as a few extras for family and friends. It’s a really simple card to make. Here’s what you need:
- Book Page
- Colored paper – 1 color for background, 1 for hat, 1 for nose, and 1 for the book (I bought the single sheets of scrapbook paper they have at Michael’s)
- Tiny black buttons
- Embroidery thread – brown for the arms, black for the mouth and eyes, and a color that will blend in with the scarf
- Ribbon
- Blank cards (I would recommend no smaller than 5 x 6.5″)
- Scissors, craft glue (liquid or stick), a pencil, a needle, and (possibly) a hot glue gun
Now, I’m not going to give you many measurements. I eye-balled the whole thing for the first card, then used those pieces to make templates to follow for the other cards. First, cut the piece of paper you have chosen for your background color. I’d make it about 1/4 inch smaller than the face of the card, all the way around. I used some crafting scissors that I had lying around to make a decorative edge. This is the surface on which you’ll build the snowman. DO NOT glue it to the card yet.
Next, cut your circles. I actually used medicine bottles of different sizes as a guide for my circles. All of the existing templates I had were too large. Once they are cut, go ahead and glue them to the background that you’ve already cut. It should fit entirely on this piece of paper. If it doesn’t, then you need smaller circles.
Now, cut out the remainder of your pieces. I just cut a small corner off the orange paper for a carrot nose. For the hat and the book, I cut small squares from the corners of each of the other colors. I free-styled the top hat, but I drew the basic shape of an open book and cut on the lines. The only rule on size here is that they should be proportionate to the head and the torso (as seen above). Glue these three pieces down, too. The hat may hang off the background, but it should stay on the card.
Next, we are going to add a few embellishments. You’ll need a needle with an eye large enough for the embroidery thread. You don’t want to double the thread, like you would for regular sewing. Just pull about 2 inches through the eye (less if you’re experienced), let it hang, and tie a knot in the long end (try to keep it small). Poking through the card is not super easy, but it can be done. Use the brown to create two arms. Use black thread to sew on the tiny buttons for eyes. Without cutting the thread, go down below the nose and add a few stitches for the mouth. Three or four should do it. The last embellishment is the scarf. Use a short strip of ribbon, cut on the diagonal. In most cases, glue won’t be enough to hold it, so I recommend using a few stitches (again, 3 or 4 should do it) to hold it in place.
The final step of the assembly is to take the snowman you’ve built on the background paper and glue the whole thing down on the card. This will keep your knots hidden. You may want to use hot glue for this step, but craft glue or simple white school glue will work for the rest.
As a final touch, I wrote the words “I hope this holiday season finds you with your nose in a good book” on the inside. I thought it was a nice sentiment to share with other readers.
I would love to see other bookish Christmas card ideas, so if you’ve come across any or made any bookish cards of your own, please share in the comments.